部分笔记参考爱编程的大丙
final和override
final关键字(置于类或虚函数后面)→ 限制某个类不能被继承,或者某个虚函数不能被重写。
1
2
3
4
5
6
7
8
9
10
11
12
13
14
15
16
17
18
19
20
21
22
23
24
25
|
class Base
{
public:
virtual void test() final
{
cout << "Base class...";
}
};
class Child final: public Base
{
public:
void test()
{
cout << "Child class...";
}
};
class GrandChild : public Child
{
public:
};
|
override关键字确保在派生类中声明的重写函数与基类的虚函数有相同的签名,同时也明确表明将会重写基类的虚函数,这样就可以保证重写的虚函数的正确性,也提高了代码的可读性,和final一样这个关键字要写到方法的后面。
1
2
3
4
5
6
7
8
9
10
11
12
13
14
15
16
17
18
|
class Base
{
public:
virtual void test()
{
cout << "Base class...";
}
};
class Child : public Base
{
public:
void test() override
{
cout << "Child class...";
}
};
|
auto类型推导
使用auto声明的变量必须要进行初始化,以让编译器推导出它的实际类型,在编译时将auto占位符替换为真正的类型。
1
2
3
4
5
6
7
8
9
10
11
12
13
14
15
16
17
18
19
20
| auto x = 3.14;
int temp = 110;
auto *a = &temp;
const auto &b = temp;
#include <map>
int main()
{
map<int, string> person;
for (auto it = person.begin(); it != person.end(); ++it)
{
}
return 0;
}
|
智能指针
shared_ptr控制对象的生命周期(强引用),当引用计数降为0时,对象(资源)即被销毁(只要还有一个指向x的shared_ptr存在,x对象就不会析构!)
weak_ptr不控制对象的生命期(弱引用),它亦是引用计数型智能指针,但无法增加对象的引用次数,它知道对象是否还存活(若对象还存活,可以提升lock()为shared_ptr,提升失败则返回空的shared_ptr,这一过程是线程安全的!)
unique_ptr提供对动态分配的单一对象所有权的独占管理。通过独占所有权,确保只有一个unique_ptr可以拥有指定的内存资源,移动语义和右值引用允许unique_ptr在所有权转移时高效地进行转移!
shared_ptr的交叉引用问题
1
2
3
4
5
6
7
8
9
10
11
12
13
14
15
16
17
18
19
20
21
22
23
24
25
26
27
28
29
30
31
32
33
34
35
| #include <iostream>
#include <memory>
using namespace std;
class B;
class A
{
public:
A() { cout << "A()" << endl; }
~A() { cout << "~A()" << endl; }
shared_ptr<B> _ptrb;
};
class B
{
public:
B() { cout << "B()" << endl; }
~B() { cout << "~B()" << endl; }
shared_ptr<A> _ptra;
};
int main()
{
shared_ptr<A> pa(new A());
shared_ptr<B> pb(new B());
pa->_ptrb = pb;
pb->_ptra = pa;
cout << pa.use_count() << endl;
cout << pb.use_count() << endl;
return 0;
}
|
- 以上代码输出
A() B() 2 2,显然强智能指针管理的资源未能释放,这是因为程序结束时,强智能指针管理的资源计数-1不为0,因此无法释放。
shared_ptr交叉引用会导致new的资源无法释放,从而造成资源泄露问题!→ 注意到weak_ptr并不改变资源的引用计数,相当于”观察者“,故可以用weak_ptr解决交叉引用问题!
1
2
3
4
5
6
7
8
9
10
11
12
13
14
15
16
17
18
19
20
21
22
23
24
25
26
27
28
29
30
31
32
33
34
35
| #include <iostream>
#include <memory>
using namespace std;
class B;
class A
{
public:
A() { cout << "A()" << endl; }
~A() { cout << "~A()" << endl; }
weak_ptr<B> _ptrb;
};
class B
{
public:
B() { cout << "B()" << endl; }
~B() { cout << "~B()" << endl; }
weak_ptr<A> _ptra;
};
int main()
{
shared_ptr<A> pa(new A());
shared_ptr<B> pb(new B());
pa->_ptrb = pb;
pb->_ptra = pa;
cout << pa.use_count() << endl;
cout << pb.use_count() << endl;
return 0;
}
|
weak_ptr如何调用其它类的方法?
实际场景中,利用弱智能指针的特性解决了资源泄露问题,但是类B想通过智能指针调用类A中的一个方法,并不能直接调用,因为弱智能指针weak_ptr只能观察资源,而无法使用资源。
- 尝试将
weak_ptr提升为shared_ptr以调用其它类的方法,使用_ptr.lock()提升,并判断是否提升成功,提升成功则可以顺利调用!
1
2
3
4
5
6
7
8
9
10
11
12
13
14
15
16
17
18
19
20
21
22
23
24
25
26
27
28
29
30
31
32
33
34
35
36
37
38
39
40
41
42
43
44
45
46
47
| #include <iostream>
#include <memory>
using namespace std;
class B;
class A
{
public:
A() { cout << "A()" << endl; }
~A() { cout << "~A()" << endl; }
void testA() { cout << "testA()" << endl; }
weak_ptr<B> _ptrb;
};
class B
{
public:
B() { cout << "B()" << endl; }
~B() { cout << "~B()" << endl; }
void func()
{
shared_ptr<A> ps = _ptra.lock();
if (ps != nullptr)
{
ps->testA();
}
}
weak_ptr<A> _ptra;
};
int main()
{
shared_ptr<A> pa(new A());
shared_ptr<B> pb(new B());
pa->_ptrb = pb;
pb->_ptra = pa;
pb->func();
cout << pa.use_count() << endl;
cout << pb.use_count() << endl;
return 0;
}
|
右值引用
左值是指存储在内存中、有明确存储地址(可取地址)的数据;
右值是指可以提供数据值的数据(不可取地址)。
关于&&的使用:
- 左值和右值是独立于他们的类型的,右值引用类型可能是左值也可能是右值。
- 编译器会将已命名的右值引用视为左值,将未命名的右值引用视为右值。
- auto&&或者函数参数类型自动推导的T&&是一个未定的引用类型,它可能是左值引用也可能是右值引用类型,这取决于初始化的值类型。
通过右值推导 T&& 或者 auto&& 得到的是一个右值引用类型,其余都是左值引用类型。
1
2
3
4
5
6
7
8
| int&& a1 = 5;
auto&& bb = a1;
auto&& bb1 = 5;
int a2 = 5;
int &a3 = a2;
auto&& cc = a3;
auto&& cc1 = a2;
|
移动语义和完美转发
std::move移动语义
在C++11添加了右值引用,并且不能使用左值初始化右值引用,如果想要使用左值初始化一个右值引用需要借助std::move()函数,使用std::move方法可以将左值转换为右值。使用这个函数并不能移动任何东西,而是和移动构造函数一样都具有移动语义,将对象的状态或者所有权从一个对象转移到另一个对象,只是转移,没有内存拷贝。
1
2
3
4
5
6
7
8
9
10
11
12
13
| class Test
{
public:
Test(){}
}
int main()
{
Test t;
Test && v1 = t;
Test && v2 = move(t);
return 0;
}
|
std::move的应用场景
假设一个临时容器很大,并且需要将这个容器赋值给另一个容器,就可以执行如下操作:
1
2
3
4
5
6
| list<string> ls;
ls.push_back("hello");
ls.push_back("world");
......
list<string> ls1 = ls;
list<string> ls2 = move(ls);
|
std::forward完美转发
右值引用类型是独立于值的,一个右值引用作为函数参数的形参时,在函数内部转发该参数给内部其他函数时,它就变成一个左值,并不是原来的类型了。如果需要按照参数原来的类型转发到另一个函数,可以使用C++11提供的std::forward()函数,该函数实现的功能称之为完美转发。
1
2
3
4
5
6
7
8
9
10
11
12
13
14
15
16
17
18
19
20
21
22
23
24
25
26
27
28
29
30
31
32
33
34
35
36
37
38
39
40
41
42
43
44
45
46
47
48
49
50
51
52
53
54
55
56
57
| #include <iostream>
using namespace std;
template<typename T>
void printValue(T& t)
{
cout << "l-value: " << t << endl;
}
template<typename T>
void printValue(T&& t)
{
cout << "r-value: " << t << endl;
}
template<typename T>
void testForward(T && v)
{
printValue(v);
printValue(move(v));
printValue(forward<T>(v));
cout << endl;
}
int main()
{
testForward(520);
int num = 1314;
testForward(num);
testForward(forward<int>(num));
testForward(forward<int&>(num));
testForward(forward<int&&>(num));
return 0;
}
|
STL容器的emplace方法
- C++11给STL容器提供了
emplace方法,即push/insert → emplace
push/insert和emplace的区别 — 以vector为例,若直接插入对象,push_back和emplace_back无区别,而emplace_back可以只传入构造对象所需的参数,直接在容器底层构造对象即可,对效率有很大提升!
1
2
3
4
5
6
7
8
9
10
11
12
13
14
15
16
17
18
19
20
21
22
23
24
25
26
27
28
29
30
31
32
33
34
35
36
37
38
39
40
41
42
43
44
45
46
47
48
49
50
51
52
53
| #include <iostream>
#include <vector>
#include <map>
using namespace std;
class Test
{
public:
Test(int a) { cout << "Test(int)" << endl; }
Test(int a, int b) { cout << "Test(int, int)" << endl; }
~Test() { cout << "~Test()" << endl; }
Test(const Test&) { cout << "Test(const Test&)" << endl; }
Test(Test&&) { cout << "Test(Test&&)" << endl; }
};
int main()
{
Test t1(10);
vector<Test> v;
v.reserve(100);
cout << "=============" << endl;
v.push_back(t1);
v.emplace_back(t1);
cout << "=============" << endl;
v.emplace_back(20);
v.emplace_back(30, 40);
cout << "=============" << endl;
map<int, string> m;
m.insert(make_pair(10, "zhangsan"));
m.emplace(10, "zhangsan");
return 0;
}
|
future、promise等的区别?
用于并发编程中:
std::future:用于在不同线程间传递结果,它可以从异步操作中获取返回值。std::promise:用于设置一个值或异常,这些值或异常会被对应的std::future获取。std::packaged_task:包装一个可调用对象(函数、lambda表达式、bind表达式等),方便异步执行,并将结果通过std::future获取。std::async:用于异步地执行任务,并返回一个std::future对象以便获取任务结果。
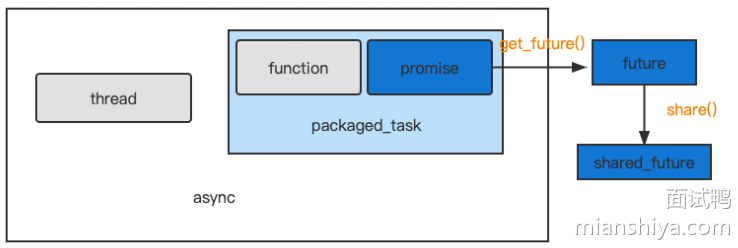
packaged_task ≈ promise + functionasync ≈ thread + packaged_task- 通过
promise的get_future()可拿到future
- 通过
future的share()可拿到shared_future
std::future和std::async
1
2
3
4
5
6
7
8
9
10
11
12
| #include <future>
#include <iostream>
int async_function() {
return 42;
}
int main() {
std::future<int> result = std::async(std::launch::async, async_function);
std::cout << "Result: " << result.get() << std::endl;
return 0;
}
|
std::promise
1
2
3
4
5
6
7
8
9
10
11
12
13
14
15
16
| #include <iostream>
#include <future>
#include <thread>
void fun(std::promise<int> prom) {
prom.set_value(42);
}
int main() {
std::promise<int> prom;
std::future<int> fut = prom.get_future();
std::thread t(fun, std::move(prom));
std::cout << "Result: " << fut.get() << std::endl;
t.join();
return 0;
}
|
std::packaged_task
用于将一个函数包装成一个可以在将来执行的任务,并将其结果封装在一个std::future对象中。
1
2
3
4
5
6
7
8
9
10
11
12
13
14
15
16
| #include <iostream>
#include <future>
#include <thread>
int fun() {
return 42;
}
int main() {
std::packaged_task<int()> task(fun);
std::future<int> fut = task.get_future();
std::thread(std::move(task)).detach();
std::cout << "Result: " << fut.get() << std::endl;
return 0;
}
|